LacePal
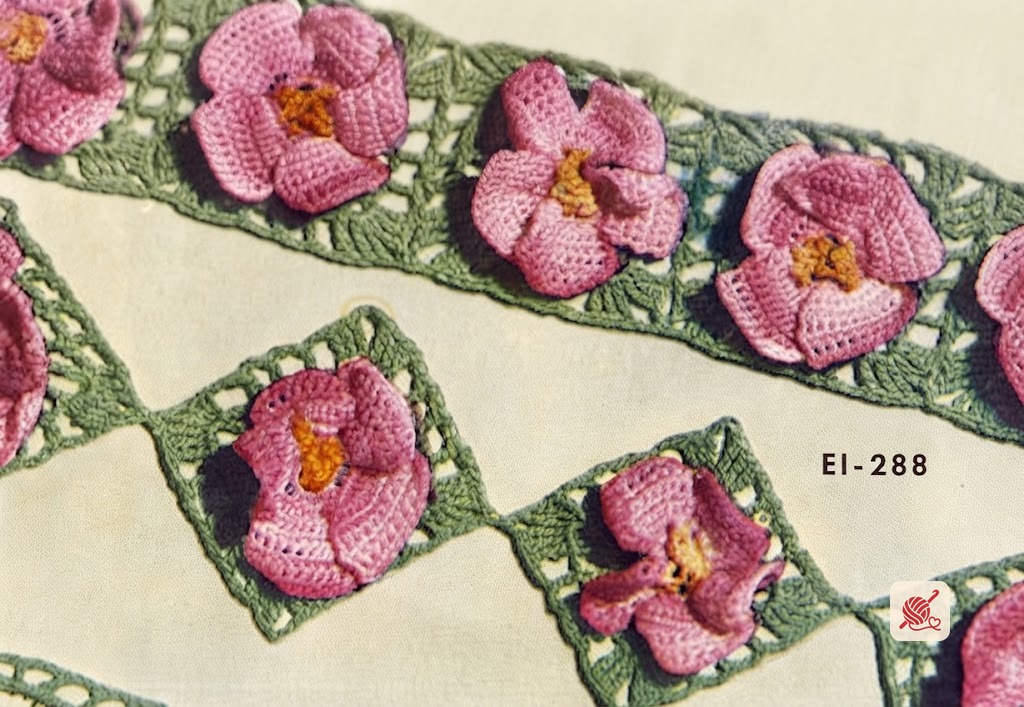
Apple Blossom Edging & Insertion Pattern #EI-288
Apple blossom motif edging and insertion in shaded pinks, yellows, and green with five-petal flowers joined at corners. Originally published in Spool Cotton #263, Floral Insertions and Floral Edgings.
Materials
- Steel crochet hook · No. 14
Pattern instructions
Materials
MATERIALS: J. & P. Coats Tatting-Crochet, Size 70, Shaded Pinks (No. 15), Shaded Yellows (No. 19) and Bright Nile Green (No. 26-B)... Steel Crochet Hook No. 14.
Edging First Motif
EDGING—FIRST MOTIF—Apple Blossom... Starting at center with Pinks, ch 8. Join with sl st to form ring.
Ch 1, 25 sc in ring. Sl st in first sc.
Now work petals individually as follows: FIRST PETAL... 1st row: 2 sc in next 5 sc. Ch 1, turn.
Sc in each sc across. Ch 1, turn. Do not turn at end of 7th row.
SECOND PETAL... Sl st in end sc of each row to base of petal. Next row: 2 sc in next 5 sc on center. Ch 1, turn and complete as for First Petal.
Make 3 more petals same as Second Petal.
BASE... 1st rnd: Attach Green on 1st row (between petals), sc in same place, * ch 5, sc between next 2 petals on 1st row. Repeat from * around, ending with sl st in first sc.
Ch 3, 4 dc in each loop around. Sl st in first dc.
Ch 5, * dc in next dc, ch 2. Repeat from * around. Sl st in 3rd ch of ch-5.
Ch 4, * in next sp make 2 tr, ch 3 and 2 tr; tr in next dc, (ch 2, dc in next dc) 5 times; ch 2, tr in next dc. Repeat from * around, ending with ch 2, sl st in top of ch-4. Break off.
CENTER... With Yellows make a chain 2 inches long. Make 5 loops of this chain to form stamens and sew in place at center of flower.
Edging Second Motif
SECOND MOTIF... Work as for First Motif until 3rd rnd of base is completed.
4th rnd: Ch 4, 2 tr in next sp, ch 1, sl st in any corner sp of First Motif, ch 1, 2 tr in same sp on Second Motif, tr in next dc, and complete as for First Motif (no more joinings).
Make necessary number of motifs, joining each to previous one as Second Motif was joined to First Motif (see illustration), having a free corner on each side of joining.
Insertion
INSERTION—FIRST MOTIF ... Work as for First Motif of Edging.
SECOND MOTIF... Work as for First Motif until 3rd rnd of Base is completed.
4th rnd: Ch 4, in sp make 2 tr, ch 1, sl st in any corner sp on First Motif, ch 1, 2 tr in same sp on Second Motif, tr in next dc, ch 1, sl st in corresponding sp on First Motif, ch 1, dc in next dc on Second Motif, and complete as for First Motif, joining next three ch-2 sps and the following corner sp to corresponding sps of First Motif as before.
Make necessary number of motifs, joining each to previous one as Second Motif was joined to First Motif.